Introduction to Mail Merge
By Definition, Mail merge means the automatic addition of names and addresses from a database to letters and envelopes in order to facilitate sending mail, especially advertising, to many addresses.
Mail Merge is a handy feature that incorporates data from both Microsoft Word and Microsoft Excel and allows you to create multiple documents at once, such as letters, saving you the time and effort of retyping the same letter over and over.
This tutorial is applicable for Word for Microsoft 365 Word for Microsoft 365 for Mac Word 2021 Word 2021 for Mac Word 2019 Word 2019 for Mac Word 2016 Word 2016 for Mac Word 2013 Word 2010.
Mail merge using an Excel in Windows
Here are some tips to prepare your Excel spreadsheet for a mail merge. Make sure:
- Column names in your spreadsheet match the field names you want to insert in your mail merge. For example, to address readers by their first name in your document, you’ll need separate columns for first and last names.
- All data to be merged is present in the first sheet of your spreadsheet.
- Data entries with percentages, currencies, and postal codes are correctly formatted in the spreadsheet so that Word can properly read their values.
- The Excel spreadsheet to be used in the mail merge is stored on your local machine.
- Changes or additions to your spreadsheet are completed before it’s connected to your mail merge document in Word.
Connect and edit the mailing list
Connect to your data source. For more info, see Data sources you can use for a mail merge.
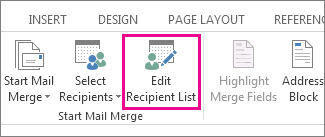
Edit your mailing list
- Choose Edit Recipient List.
- In Mail Merge Recipients, clear the check box next to the name of any person who you don’t want to receive your mailing.
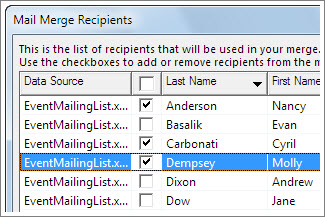
Note: You also can sort or filter the list to make it easier to find names and addresses. For more info, see Sort the data for a mail merge or Filter the data for a mail merge.
Mail merge using an Excel in macOS
Here are some tips to prepare your Excel spreadsheet for a mail merge. Make sure:
- Column names in your spreadsheet match the field names you want to insert in your mail merge. For example, to address readers by their first name in your document, you’ll need separate columns for first and last names.
- All data to be merged is present in the first sheet of your spreadsheet.
- Data entries with percentages, currencies, and postal codes are correctly formatted in the spreadsheet so that Word can properly read their values.
- The Excel spreadsheet to be used in the mail merge is stored on your local machine.
- Changes or additions to your spreadsheet are completed before it’s connected to your mail merge document in Word.
For more information, see Prepare your Excel data source for mail merge in Word.
Connect and edit the mailing list
Connect to your data source. For more info, see Data sources you can use for a mail merge.
- Choose Edit Recipient List.For more info, see Mail merge: Edit recipients.
For more info on sorting and filtering, see Sort the data for a mail merge or Filter the data for a mail merge.
- Select OK.